Thousand Oaks vs. Baader Planetarium Solar Filter Films

With all the buzz about the eclipse going on I thought about revisiting the topic of solar filters. I’d previously imaged the sun very precariously using regular ND filters (10-stop, or stacked 10-stop + 6-stop) but this is inadvisable as they’re not rated for this use. I did this by shielding the entire aperture with a piece of cardboard between photos and manually jerking it out of the way just in time for each photo (based on my intervalometer’s pre-photo beeps). This was years ago and near as I can tell there was no damage to my equipment but it was still a bad idea in hindsight. I was perhaps lucky; not all conditions and filters are the same, and damage to your focusing screen, sensor, and even eyes could result (it’s largely about the parts of the EM spectrum you can’t see).

Considering instead filters meant specifically for solar photography using a camera with a super-telephoto lens, you essentially have two options — screw-on glass solar filters, and solar filter film. I haven’t experimented with the former, this post is specifically about the latter.

Two common solar filter films I saw suggested on astronomy discussion forums are sold by Thousand Oaks (TO) and Baader Planetarium (BP) and I ended up doing a side-by-side comparison.

My first purchase was a 6x6” square of Thousand Oaks film on Amazon. The Amazon listing is a little ambiguous about which of their films you’re buying, I believe I received what they call their “Silver-Black Polymer Sheets.”

For comparison, I ordered (also on Amazon) the Baader Planetarium “AstroSolar Safety Film 5.0.”

As they’re intended for use on any aperture size, both of these products require you to construct your own filter holders. There are myriad instructions online for how to do this so I’ll omit providing any of my own here. I made holders for both films using Planters 10oz peanut cans with the bottoms removed, a hot glue gun, and a lot of tape. It turned out that with a little effort the inside of the Planters cans fit nicely around the extended hood of the Canon 400mm f/5.6L USM I picked up used (see previous post). I will say that the TO film is much more sturdy, I felt less nervous building the TO film filter holder vs. the BP, which felt like handling gold leaf by comparison.

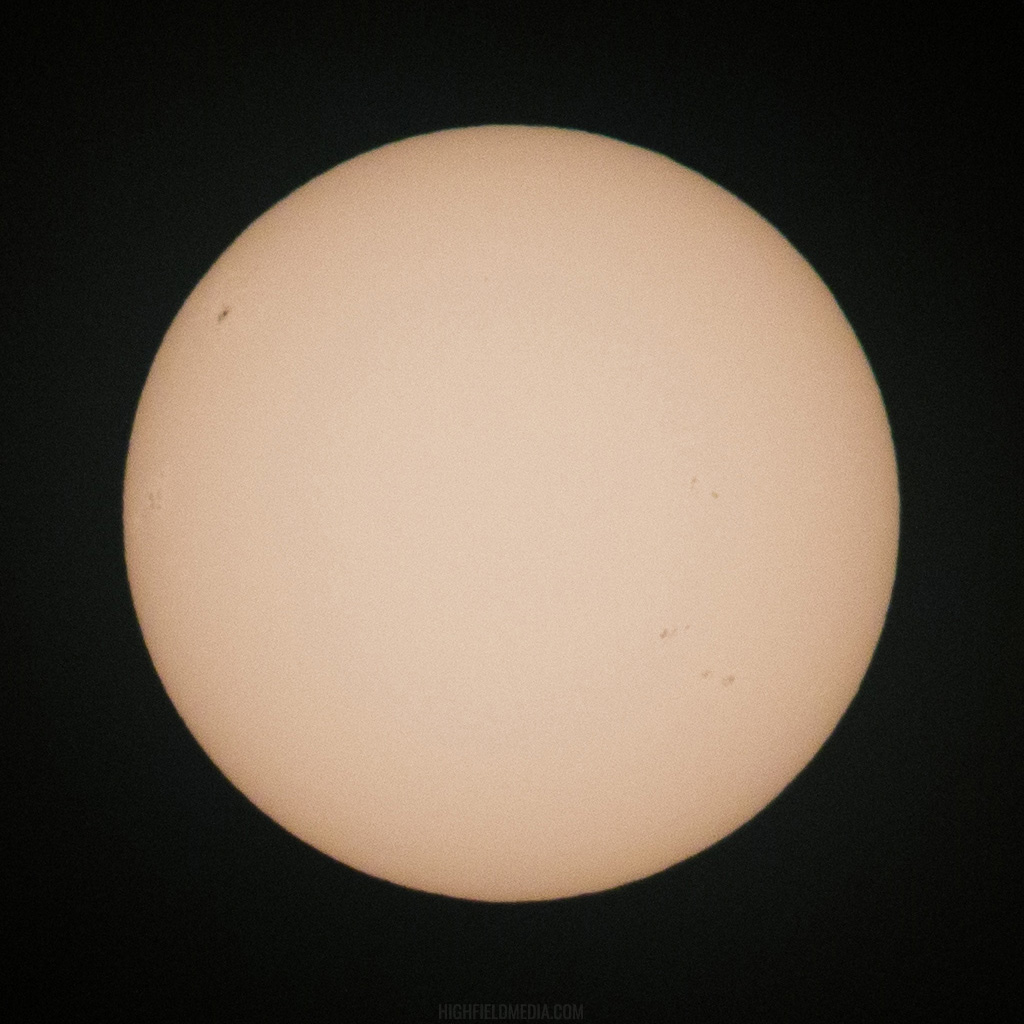
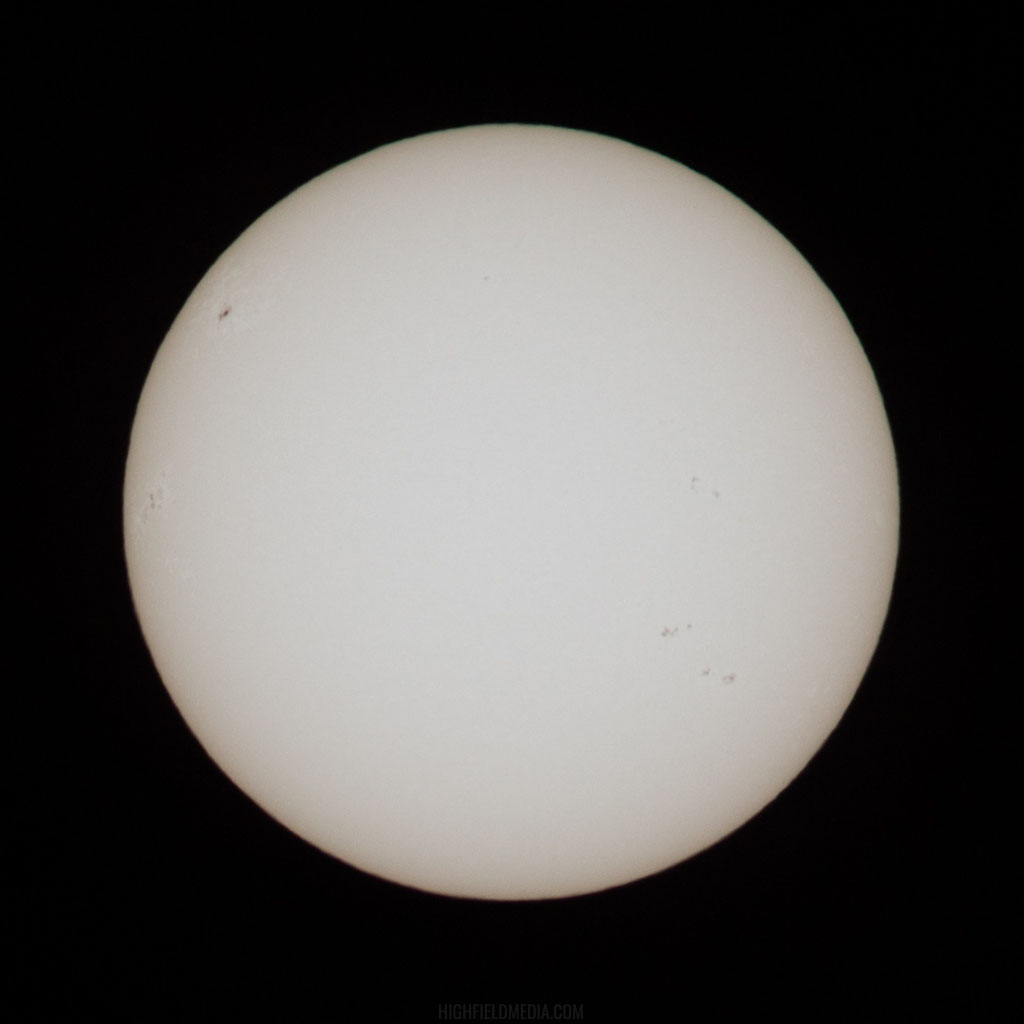
Here’s a side by side comparison of solar images through the TO and BP filter materials (TO on the left, BP on the right):
fog_before fog_after

The above photos are 1024x1024 full-resolution crops from a Canon 6D using the Canon 400mm f/5.6L USM with a Canon 1.4x teleconverter (original version, quite old). In each the sun was about half-way between center and the top of the frame (the sun moves quite fast when you’re futzing around with settings at 560mm equivalent focal length). I also rotated the BP image to align with the TO image, as the sun’s movement between filter swaps resulted in a small line-of-sight rotation relative to my pan/tilt mount (this reduces the BP image sharpness slightly).

The teleconverter undoubtedly reduces the sharpness some also, and I’m not sure if there’s a clear difference in terms of optical clarity between the two filter materials. However, the BP filter lets through way more light, so the ISO ends up being lower, hence the much higher relative amount of noise in the TO image, and better definition of the sunspot detail using the BP film. My initial interest in the BP film was after seeing a blog post somewhere else that compared the two films and showed a much sharper image with the BP film. In hindsight, I suspect that poster may have had the same challenge I did — difficulty focusing through high-ISO noise on Live View. I may have better luck running the camera tethered and using the EOS app to adjust focus, I’m not currently set up for that though, so TBD I guess. In-camera settings for each, to give you an idea about the difference in light transmission:

  • TO: f/8.0, 1/800s, ISO1600

  • BP: f/8.0, 1/1600s, ISO100

Doing the math (and excluding my LR adjustments), there’s about a 5-stop difference which is more than I would have expected. Also, the TO filter (as advertised) produced a really strong orange tint, which is maybe what you expect thinking about the sun as a cartoonish yellow orb in the sky, whereas the BP provided a nearly perfectly white image of the sun. I used the white balance eyedropper in Lightroom to bring the TO closer to white, for the side-by-side comparison, but I made no additional effort to match the white balance.

I’ve included a gallery at the bottom of this post showing the “As-Shot” and edited Lightroom settings I used for each. I didn’t think too hard about this for the editing, just played around to get some extra contrast in the sunspots. Note that some of the LR screenshots shows f/5.6; this is because I have several of the pins taped off in the teleconverter so I can still use autofocus with this slow lens. I’m shooting wide-open through the teleconverter which gives me an f/8 equivalent aperture for both photos. Also keep in mind that the “As Shot” white balance values are just what my Canon 6D decided to go with based on a small disk of light against a large black background, I wouldn’t consider either of these to be objective truths on color rendition.

In addition to loss of sharpness using the TC, I found it really difficult to focus the lens on the sun, especially with the TO film. The decreased amount of light means Live View is using a much higher ISO, so the image is just boiling with noise in 10x viewfinder crop mode, and coupling that with the 2x2 or 3x3 (?) pixel binning that occurs in Live View on this camera, it’s more of a guessing game than anything else. The backlash in the focusing mechanism makes me skeptical that using the scale reading will be a reliable means of getting focus for solar imaging.

In conclusion, I’ll probably use the Baader film for imaging because of the more neutral color rendition and better exposure flexibility, but the Thousand Oaks may go on a spotting scope or something for visual observation, e.g., during an eclipse. I think the orange disk of the sun through the TO looks quite nice, from a purely aesthetic standpoint.

A Bridge through the Clouds

The Quadrantids meteor shower was a total bust here in Austin; the radiant point was below the horizon during the predicted peak and a light cirrus layer to the north and a full moon made sure I wouldn't see any stragglers.

However, the silver lining is that my planned shooting site up at Lake Travis gave me an early warning to a layer of lake/river fog flowing through the Colorado River valley from the north and I was able to make it to the 360/Pennybacker Bridge just in time to capture it.

Lost in Space: Double Sighting of a Derelict Spacecraft

On the night of May 23rd, I was on a job down in a friendly south Texas town called Cuero. It was a hazy night, with high-altitude fast-moving cirrus clouds coming and going every 20-30 minutes. Not particularly ideal conditions for astrophotography, but excellent for showing off the interesting light patterns that a small town casts off. Unlike a big city, the light pollution of a small town comes from very concentrated sources, and each of them is often monochromatic. For instance, an oil services depot in the countryside may use sodium vapor lamps, while the city itself may use mercury vapor lamps. Various farming and oil operations across the landscape all use different lighting sources, which makes for a beautiful array of colors in a long exposure.

I spent 30-40 minutes filming a few short scenes from an overlook south of town (a popular spot among the locals). Being pretty busy with other projects and processing cityscape scenes of Cuero, I didn't actually have time to review this footage until last night. What I discovered was at first a curiosity to me as a photographer, but turned into something I would find fascinating as an aerospace engineer.

Early in one of my first image sequences there was a 5 frame series of streaks in the sky, all seemingly connected. Sure enough, the streaks lined up perfectly, and after stacking the frames in Photoshop and doing a little minor touching-up, I was rewarded with the following image:

If one looks closely at the top-center of the image, the two streaks can be seen. A detail shot is shown below:

Once I realized this wasn't an aircraft, I knew it was most likely an orbiting object, and even more interesting was that this orbiting object had apparently flared twice in a single pass.

(Aside: A satellite flare is a highly specular reflection of the sun off of solar panels or other glossy surfaces on an orbiting spacecraft. The spacecraft must have a very special alignment to direct the rays of the sun to an observer on the dark side of the Earth, so seeing one flare, let alone two distinct flares in a row is quite rare.)

The aerospace engineer in me took over and I set about doing some back-of-the-envelope orbit determination to be sure I was looking at a satellite. I looked up the nearby stars on my trusty star chart and estimated the observed angular distance traveled during the 50 second flare interval. I then applied some trigonometry and the definition of mean motion, and I was able to ascertain that the body was indeed moving at the correct angular rate to be in low-Earth orbit. Just by observing the direction the flares pointed in, I knew it was a highly inclined orbit also. My coarse calculations alone didn't help me identify the specific object, but they at least confirmed that what I had captured could most likely be attributed to an orbiting body.

Exactly identifying the body by continuing in this manner seemed daunting . At best, my calculations would perhaps narrow the list of potential objects down to a few hundred. I knew estimating the other orbital elements based on my crude observations would be difficult to impossible. To make matters worse, the internal clock on my camera was significantly off (and had since been corrected), so the image timestamps were useless for finding any absolute timing information. I quickly realized this could turn into a rather laborious exercise of parsing and sorting Space Track data.

Fortunately, I remembered that my favorite planetarium software, Stellarium, was bundled with a plugin that seamlessly pulls two-line elements from Celestrak to display satellites passing overhead. I knew approximately when I was out shooting that night (based on when I sent some text messages as I was packing up), and sure enough, I was able to quickly find a spacecraft that exactly fit the observed trajectory:

What I had captured was the Advanced Land Observation Satellite (ALOS), otherwise known as Daichi. ALOS is a Japanese Earth-observing satellite that was launched in 2006. At 4,000kg, ALOS is a fairly large vehicle (hence the name -- Daichi can be roughly translated from Japanese as "big"). Here's what ALOS looks like:

Advanced Land Observation Satellite. (C) Japan Aerospace Exploration Agency (JAXA)

Advanced Land Observation Satellite. (C) Japan Aerospace Exploration Agency (JAXA)

In 2011, after only five years, the ALOS mission was cut short by an unknown technical fault. It has been speculated that the vehicle sustained damage from a meteoroid impact causing the spacecraft to enter a power saving mode and become unresponsive. Despite this, ALOS is considered to be a success in that it exceeded its three year design life and collected a vast amount of high resolution imagery of the earth. This imagery is being used to construct a high-resolution global digital map which will have broad applications in mapping, natural disaster damage analysis, and water resource research [link].

ALOS has been derelict in a 700km altitude sun-synchronous orbit for the past 5 years. With no active attitude control systems, the vehicle is undoubtedly in a tumbling state, which increases the possibility for multiple flares as I was able to observe two weeks ago. At such a high altitude, ALOS will likely be in orbit for decades (or more) to come.

In yet another amazing coincidence, the successor to ALOS, ALOS-2, aka Daichi-2 was launched by JAXA at almost the SAME TIME I photographed ALOS (May 24th, 2014 at 03:05 UTC, or May 23rd, 2014 at 10:05PM CST)!

ALOS-2 also has an Earth-observing mission, but, unlike ALOS, has no optical cameras, and relies solely on radar for its imaging duties.

This wound up being a long post, but it's not often that I get a direct connection between my photography work and my aerospace engineering background. This string of coincidences was quite a treat!

The Road to Terlingua

About two months ago I headed out on what I had intended to be a 4-5 day long excursion in Big Bend National Park. One of the darkest regions in North America, Big Bend is an astrophotographer's playground. I had detailed plans to spend long nights shooting sky imagery in the desert, sleeping as late into the afternoon as rising temperatures would allow before moving on to another campsite with another set of foreground terrain.

Upon arrival in Big Bend National Park, my Land Cruiser suffered a cooling system blowout. A stream of blood-red Toyota coolant trickles out from under the engine bay.

I arrived in the park at about 6:30AM. The visitor's center was closed until 9:00AM, so after briefly trying to nap amidst the cacophony of other visitors' engines and slamming trash cans, I got out of my Land Cruiser and went for a short walk. Upon my return I noticed a stream of blood red Toyota coolant running down the parking lot. I popped the hood to be greeted by a wet, sweet smelling mess -- high pressure coolant had evidently been spraying all over the engine bay. I couldn't find the source of the leak by visual inspection, but I had lost a substantial amount of coolant. How I made it all the way into the park without tripping the temperature alarm on my Ultragauge, I have no idea. Had there been any traffic whatsoever to bring me to a stop I probably would have seen wisps of steam wafting out from under the hood (and I likely would have overheated from lack of airflow too).

Back in Austin, or near any other big city for that matter, this wouldn't be a big deal. In Austin I could have been towed home allowing me to conduct diagnostics on my own and replace whatever part had failed. Out in Big Bend, one of the most remote parts of North America, it was quite a different story. The visitor's center had no land line I was permitted to use, nor were there any payphones nearby. Cell service was virtually nonexistent. After countless attempts and through some fortunate convergence of atmospheric conditions, antenna orientation, and sheer dumb luck, I was able to get a very faint cell signal for a few brief minutes; just long enough to phone AAA. After hurriedly explaining my problem, and my location, they told me they'd have help to me soon. I was skeptical, given my location, but what the hell; I had no choice but to wait.

A few hours later, an amiable fellow named Beechie of Beechie's Auto Service arrived in his flatbed tow truck. After a few brief words, he winched my Land Cruiser up onto his truck and we set off toward the only settlement that had a mechanic within 100 miles -- Study Butte-Terlingua.

Study Butte-Terlingua; an oasis of civilization in one of the most remote parts of North America.

We arrived after nearly an hour of driving through the epic and picturesque scenery of Big Bend, along the way discussing fascinating stories about Beechie's thirty plus years living in the area. A small collection of homes and businesses at the intersection of State Highways 118 and 170, Study Butte-Terlingua serves as a community focal point for many hundreds of people living in the surrounding desert. A gas station, restaurant, bank, post office, motel, and an automotive garage are the highlights. Many folks drive 60-100 miles just to run errands in Study Butte or Alpine (a much bigger, but more distant town).

The Land Cruiser is unloaded from Beechie's Auto Service's flatbed truck. Beechie is one of the few tow operators who can rescue stranded vehicles from some of the more rugged areas of the park.

Once my Land Cruiser was off the flatbed, Tommy at Terlingua Auto Service got to work. With the aid of a coolant system pressure tester, he quickly discovered that my upper radiator hose had blown out at the bottom edge of the lower clamp. It was impossible to see without pressurizing the cooling system because the rubber had contracted back underneath the clamp, hiding the tear. It's amazing how fast rubber can go bad. Just a year earlier, while doing some cooling system maintenance, I'd found the upper radiator hose to be pliable and in fair shape.

After calling around, it was discovered that it would take three or more days for a replacement hose to arrive by special shipping arrangement from Dallas. That would be three days I would be stuck in Study Butte-Terlingua, unable to leave town to go take pictures. Instead, it was decided that we should cut the bad part of the hose off and try to short the connection. In doing so, it became obvious that in fact the entire hose was the "bad part" (on the verge of disintegrating), and that our MacGyver fix would likely fail again very soon. I was encouraged to either head back to more, shall we say, 'logistically-able' parts of Texas, or else have it blow out on me again somewhere in the desert. At that point, best case scenario, I could get a cell signal again and be towed back to then wait 3 days in Study Butte-Terlingua for a replacement hose anyway. Terlingua Auto Service charged me a fair price for the work, and I was sent on my way.

The Big Bend Mission Lodge in Study Butte-Terlingua, TX. Although the rooms are spartan, they're clean and affordable.

At this point, I knew my trip to Big Bend was over. I decided to pull one relatively low-risk attempt at getting some photo work done on the trip. However, I was still dead tired -- I had driven all night from Austin, and had been unable to get any meaningful rest while at Panther Junction or at any time since. Getting some shuteye was my first priority. It was already far too hot and sunny for me to get any sleep in the back of my Land Cruiser -- it felt like a greenhouse, even with the windows cracked. In desperation I headed over to the Big Bend Mission Lodge where only one room was available. A lucky break. Their rate was reasonable, especially since it was Spring Break (they apparently never price gouge, even during their busiest season), so I checked in and immediately passed out after setting my alarm.

I woke up at 2:30AM and had a quick shower -- a luxury I hadn't anticipated on this trip. The desert gets extraordinarily cold at night, due to a lack of warmth-retaining moisture in the air, so I bundled up against the cold and headed back toward Big Bend National Park. After driving back and forth on the amazingly well maintained desert highway between town and the park, I found the perfect spot for what I had in mind. The moon was setting in the west, and the lights of Study Butte-Terlingua were barely visible in the distance.

As the moon began to set, I saw the sky come to life with muted colors. The human eye renders the colors of low intensity light so very poorly, and seeing any color at all in such faint conditions was a good sign -- I knew then that my camera would pick them up. The resulting image, shown below and titled The Road to Terlingua, amazed me from the moment I saw it on the preview LCD. It is one of my favorite photos among the many hundreds of thousands I've taken in my life -- a moonset as brilliant as a sunset. The same Rayleigh scattering that gives a sunset its gradient from red to blue was in full effect, but its intensity was so much weaker, allowing the stars to shine through the glow as I captured the last seconds of direct moonlight cascading across the silent desert landscape.

The Road to Terlingua -- A moonset over Study Butte-Terlingua as brilliant as a sunset thanks to zero light pollution and ideal atmospheric conditions. Prints may be purchased on the Shop page.

After the moon had set, the desert landscape disappeared into what seemed to be complete darkness. There was no wind that night, and the silence and blackness were deafening. At first, all I could hear was the ever present ringing in my ears from too many years of loud music. At times I felt I could even hear my own heartbeat. The occasional rustle in the foliage, possibly 100s of yards away, made my heart race. Just deer and rabbits, I kept telling myself. With the moon and the sun below the horizon, and no light pollution to speak of, the only light to be found was from distant stars and galaxies. The thought of being bathed in such ancient starlight gives one quite a profound appreciation for mankind's diminutive stature relative to the vastness of the universe. In light of this realization, it is perhaps ironic that my next thought was to commit the arguably narcissistic act of taking a self-portrait in said starlight.

A 20 second self portrait, lit only by ancient starlight. The reflective road paint, evidently quite new, did an impressive job reflecting the low intensity and diffuse starlight (at least so far as a camera sensor is concerned).

A 180 degree view of the horizon over Big Bend. Note the orange glow on the horizon; not due to light pollution (there isn't any out there), but extremely faint Rayleigh scattering, the same phenomenon that makes a sunset transition from blue to red.

After shooting a mere 72 images, I shut my camera off to let my eyes adjust to the darkness and experience the desert skyscape as ancient man once did. As my pupils dilated and my brain became more discerning in its interpretation of the signals coming from my retinae, the sky came alive. The stars were too numerous to count; even the smallest patch of sky seemed to be completely filled in by the faint speckle of distant stars too small to be resolved by the unaided eye. Glorious bands of clouds in the Milky Way stretched across the eastern horizon like an approaching storm front. Deep sky objects I had only seen in photos revealed themselves. Though barely recognizable, I could make out numerous Messier Objects, an experience no city dweller will ever have at home without the aid of a telescope and a good idea of where to look. As a photographer it almost pains me to admit that no photo will ever do justice to such a sight!

The sky overhead in Big Bend National park, with stars far too numerous to count.

Feeling euphoric, I headed back to my motel room where I immediately started my editing process; an adventure in digital tunnel vision on my tiny laptop. After seeing the first drafts of my photos, and knowing it was almost time to head home, I took a brief nap to prepare myself.

As the sun rose the following morning, car disaster notwithstanding, it was clear to me that I had picked an ideal time for a visit. The rainstorms of the previous days had gone, and atmospheric visibility was actually pretty good (by contemporary standards, at least). Wanting to minimize my risk, I decided on a more populated route back to I-10 by way of Alpine. At least if my radiator hose had blown out again after an hour of driving, I may have instead found myself in Alpine where the prospect of getting parts to jury rig another field repair would have been more likely.

Texas State Highway 118, leaving Study Butte-Terlingua for Alpine, the county seat of Brewster County, and its only city as well.

A desolate stretch of State Highway 118 between Study Butte-Terlingua and Alpine, TX. Speed limit, 75 MPH.

Thankfully, the trip home was uneventful. A favorable tail wind gave me better than average gas mileage on the I-10 and SH 290 legs of the journey and the MacGyver repair held for the remainder of my trip. Several days later at home I noticed a fresh puddle of coolant in my driveway -- the repair had indeed failed as anticipated. Had I stayed in Big Bend and continued as planned the hose would likely have blown out while driving on an unmaintained primitive road or jeep trail in a remote corner of the park, stranding me in the worst possible situation.

It's always a bit of a disappointment when your plans don't work out, but I always do my best to re-frame such things as an adventure. If everything had gone according to plan I would probably still be post processing several hundred gigabytes of imagery, but I likely wouldn't have much of a story to tell about the experience of capturing it. Because of what happened, I learned countless lessons that will make my future trips more successful. I wouldn't have met the people I encountered on the road and in Terlingua. I probably would not have been out on that desolate highway at moonset to take that photo, either -- the composition would have been very different and perhaps it would have made for an entirely unimpressive photo.

As humans, we aren't able to make perfect plans that invariably lead to perfect outcomes, but sometimes fortune smiles upon us and what we salvage from our ill fated undertakings can mean so much more to us than what we could have ever dreamt of.

-AT

Notes:

  1. The Road to Terlingua rocketed to the #1 spot on the front page of reddit for several hours, receiving nearly 1000 comments after being viewed by well over 1 million readers.
  2. Color images were taken with a Canon 6D through 14mm f/2.8 and 8mm f/3.5 lenses by Samyang.
  3. B&W images were taken using a Konica II Rangefinder on Fujifilm Neopan Acros 100 film.