Fixing the Loose Hood of a Canon 400mm f/5.6L USM

My new-to-me used Canon 400mm f/5.6L USM lens has been core to the past few posts, I figured I should close the loop on some comments on the very first post about planespotting. In that post I commented about how I wasn’t sure if I wanted to keep it because of the rough shape it was in. While the optics, aperture, and focusing mechanism all worked fine, the exterior was beat to hell and the hood was always loose unless screwed into the extended position. The exterior being scratched up doesn’t bother me so much, just gives it some character I guess. The loose hood was just unacceptable, though. I did a little reading online and found some comments hinting on the hood being easy to remove so I figured I would roll the dice and give it a shot, maybe the repair would be as easy as I imagined (it was).

If you’ve somehow found your way here and are having the same issue, here are some tools and parts you’ll need:

  • Adhesive-backed felt:

    • I used some from Hobby Lobby I’d had on a shelf for years, see photos below. It’s not really “felt” per se, but a synthetic felt-like craft product. Mine is a generic brand called Treehouse Studio and lists a website (craftsetc dot com), which as I write this appears to be defunct.

    • Thickness is a critical factor here, and unfortunately not marked on the package. For what it’s worth, I used a dial caliper and compressed a sample of felt (with backing paper in place) as much as possible and it went down to 0.020” and on release it sprang back to 0.032”. If yours does likewise it’s probably close enough.

  • Plastic spudger:

    • The kind of little non-marring mini-prybar you get with a phone battery replacement kit or similar.

    • Optional but recommended, I only really used it to remove the rubber gasket on the end of the hood. If your lens is as old as mine this rubber may be a little fragile , no use taking a risk using a screwdriver or something. I obviously didn’t care about scratching my paint but that may matter to you.

  • Lens spanner wrench:

    • This is a specialty tool for working on lenses, it lets you manipulate the large ring fasteners on lenses using the notches or holes left for this purpose. Get one that has tips for both notches and holes, you’ll need the blade tips for notches for this job but you’ll see the holes on a lot of misc. photography gear. I think mine was like $15 on Amazon, it was one of those random 6 letter brands Amazon is full of for trademark reasons.

    • Optional? Some say that, but I disagree, I couldn’t imagine trying to remove the ring at the end of the hood with a kitchen knife or something similarly clumsy, it took quite a lot of force to get it going.

  • Q-tips and alcohol:

    • I used these to try to remove as much of the old remaining felt as possible. The glue Canon used does not dissolve with alcohol, but I think it did help break free a lot of the fibers. Use stronger solvents at your own risk, I guess.

Step 1:

Put on a lens cap to protect the front element, extend the hood, screw it into place to secure it. Next, take your spudger and get under the outside of the rubber gasket on the end of the hood. It shouldn’t take much persuasion to get it moving. Here’s a phony picture I took after I’d already removed it and decided I should document the process:

Step 2:

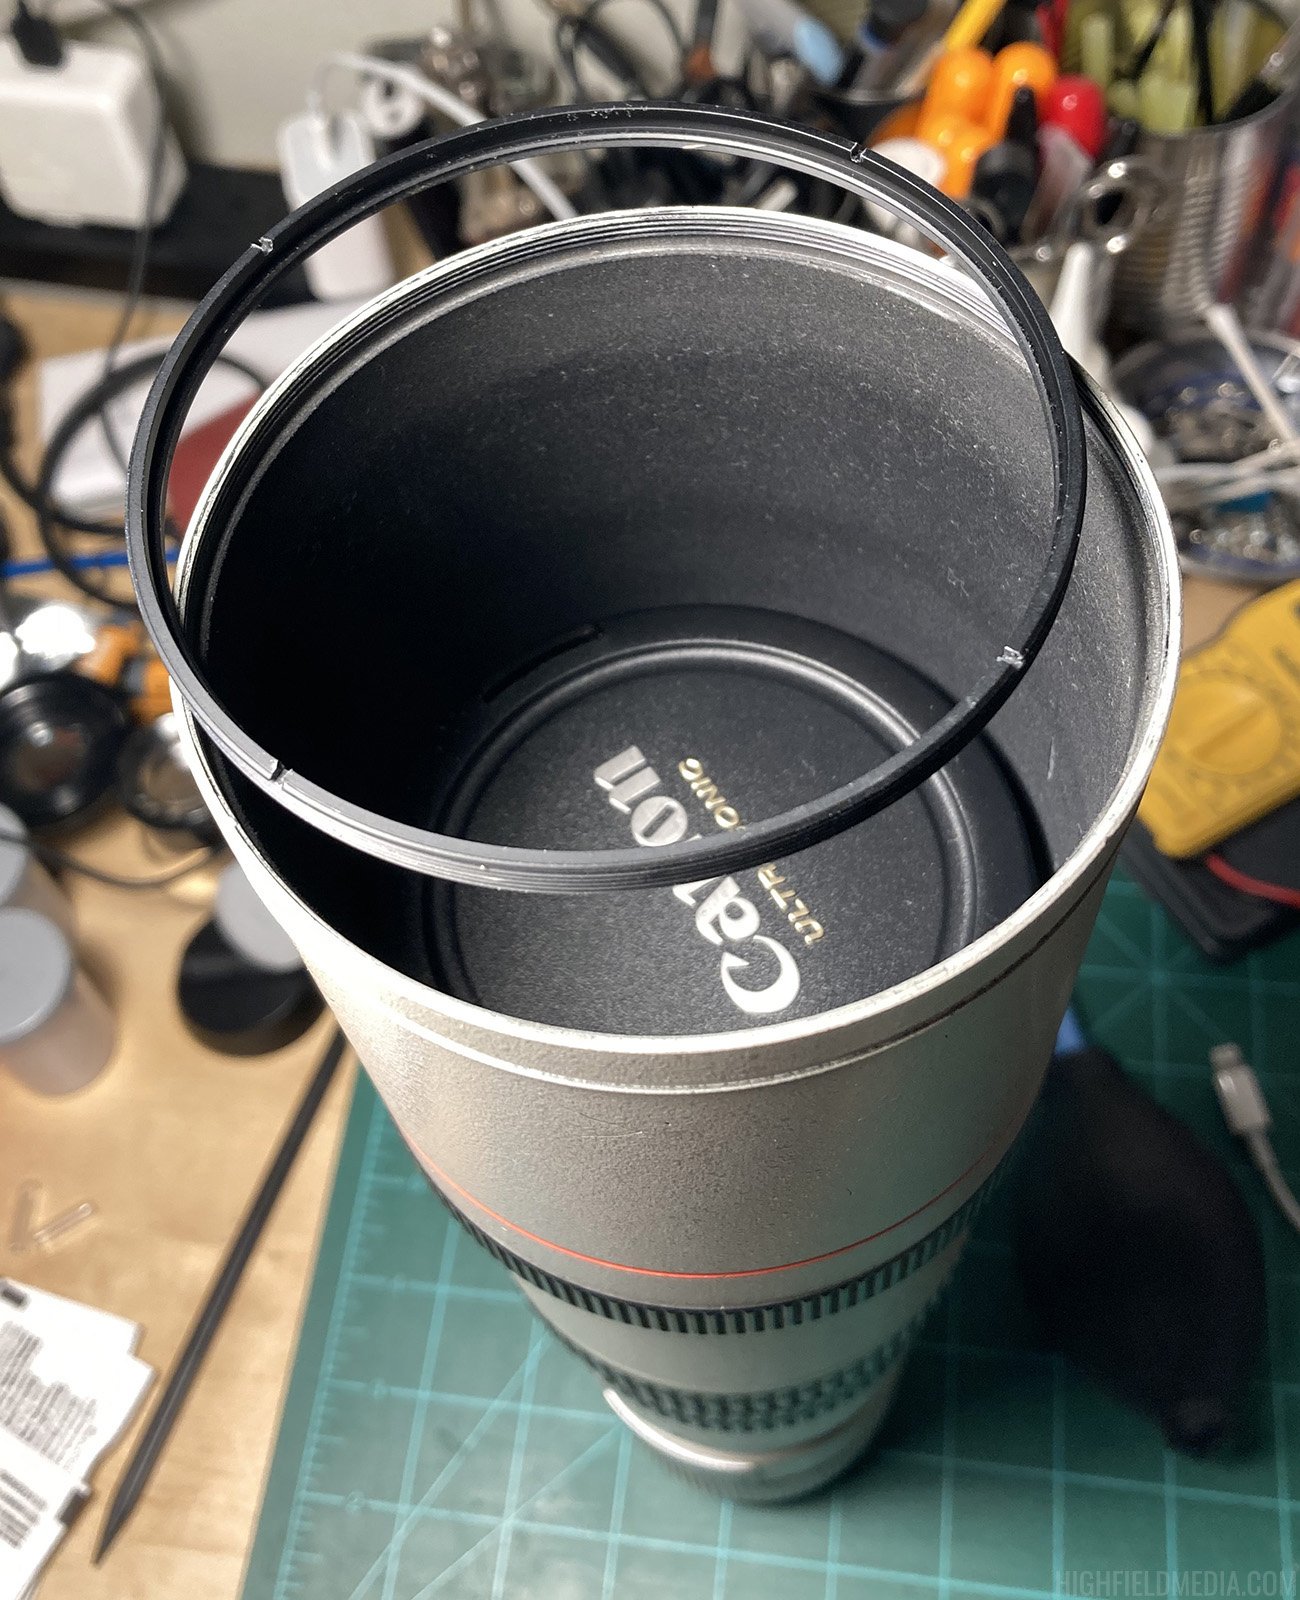
Using your spanner wrench, unscrew the ring at the front of the hood. This ring is the only thing that keeps you from sliding the hood downward toward the lens mount. It may take quite a lot of force to unscrew so be careful and hold onto the hood as you unscrew, not the lens. It’s really easy for the tips of the blades to slip out and damage the ring if you get careless. But don’t worry too much, remember that it’s going to be covered up by that rubber gasket anyway. I think either my ring or the hood was slightly out-of-round, so there were parts of each revolution that got harder/easier. Here are two more phony disassembly pictures I took after I’d already removed the ring. Please excuse the embarrassing mess in the background, as is typical for me I have like 5 projects going at the same time.

Step 3:

Remove the tripod mount ring at the middle of the lens body (if you haven’t already), then you should be able to unlock the hood and slip it down off the rear of the lens body. Check out the coarse threads on the exterior of the lens body, this is what lets the hood lock into position when you push it forward and twist. A previous owner went too crazy on this thing regularly, pretty obvious from the severe wear on the threads. Still works, at least. Be careful of the dull gray ring just above the threads, it’s a square-profile O-ring and it’s what you’re screwing the hood against when extending it. I read about people getting that thing twisted up in the lock threads and having a real bad time, I would guess this is more likely to happen if you tighten it forward too hard regularly and deform the square profile.


Step 4:

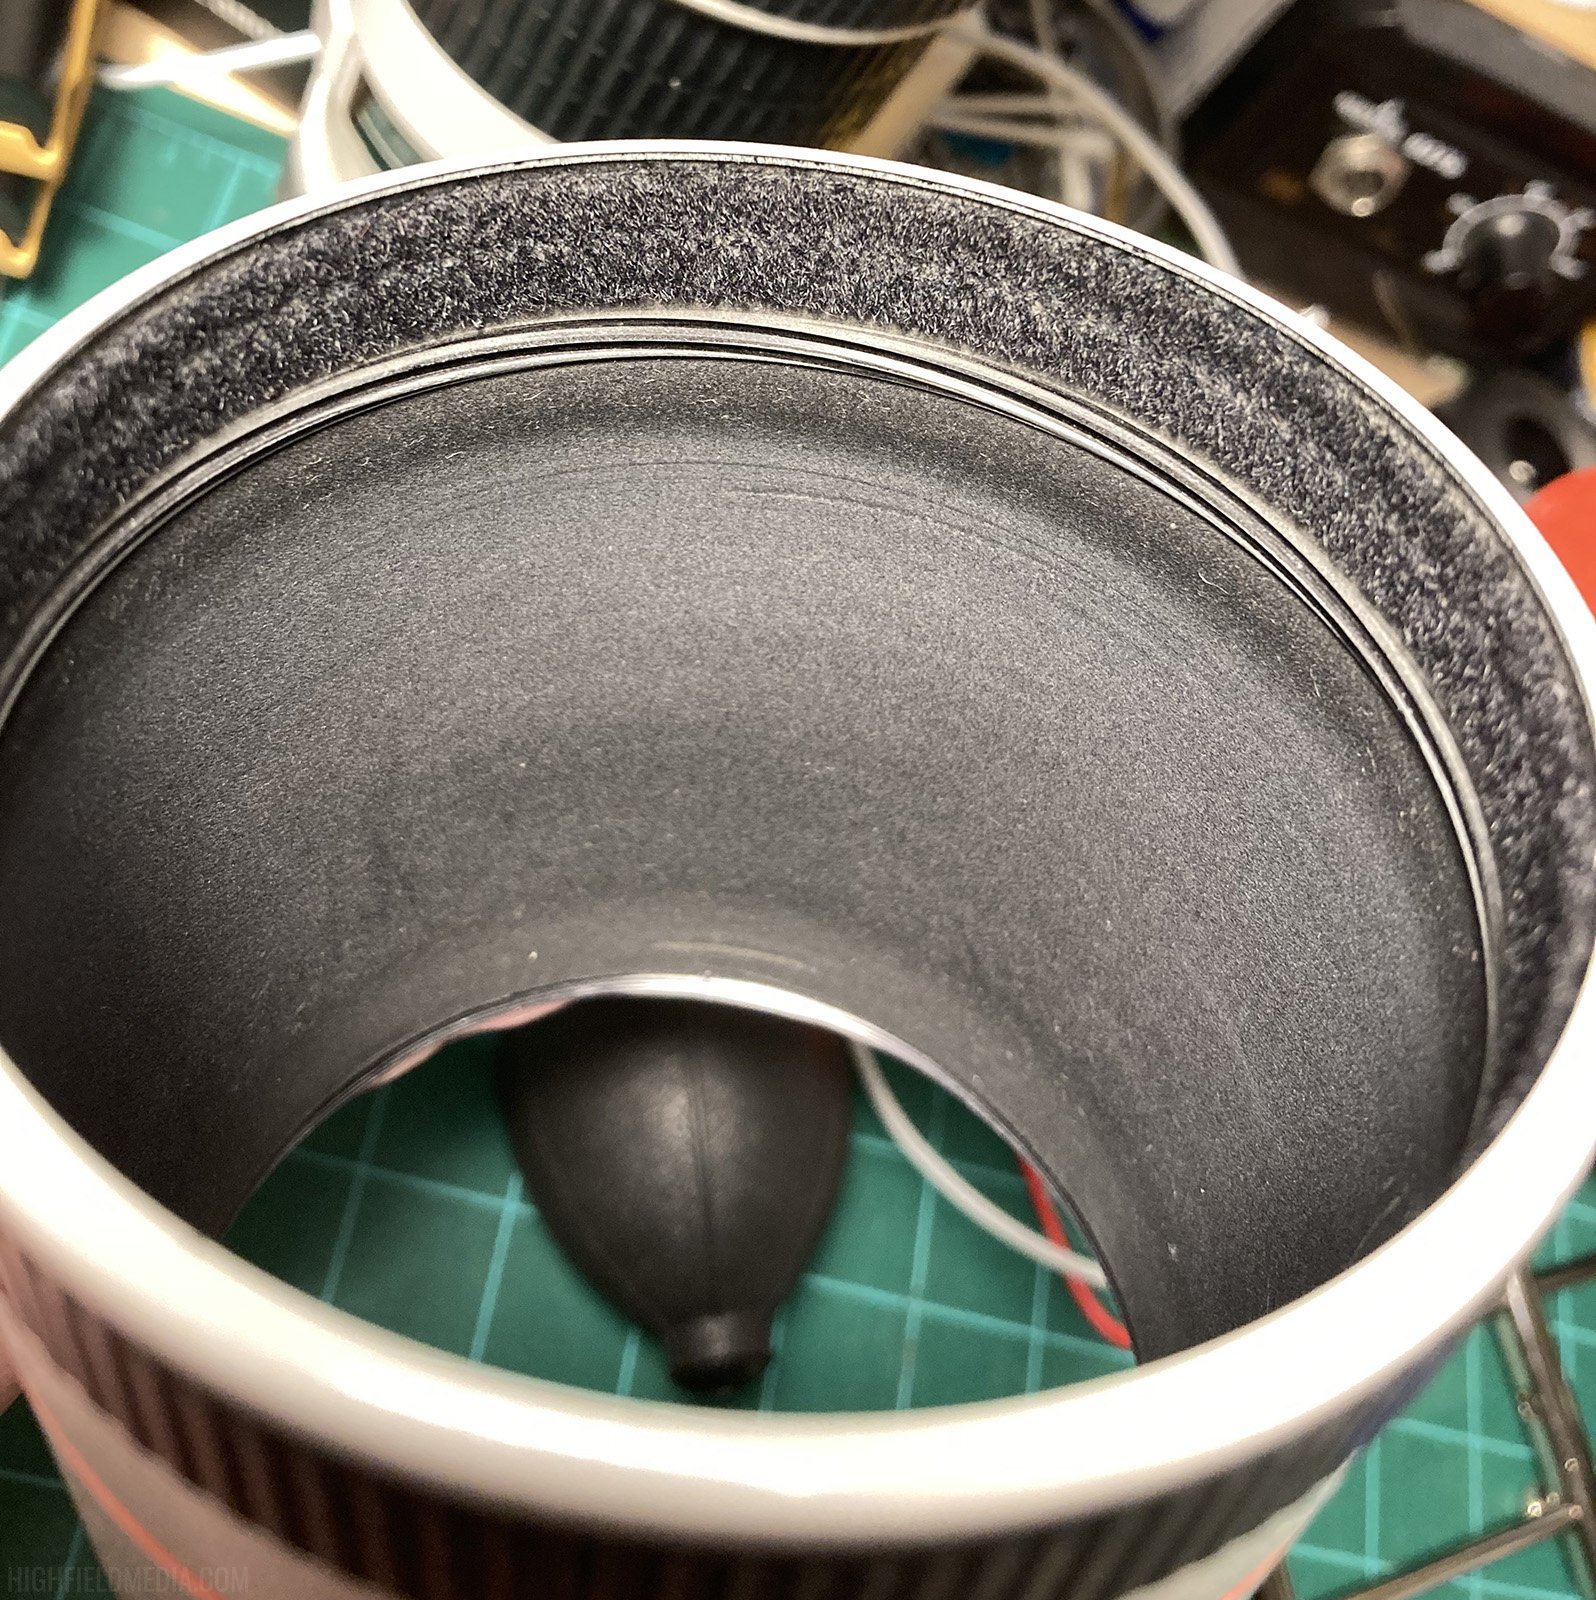
With the hood removed, check the felt behind the lock threads. I think it’s not actually “felt,” it’s synthetic and reminds me more of a cut-pile carpet, where small fibers were attached at the base and their dense packing (when new) provided the cushioning and friction the designers intended. I’m going to just keep calling it “felt" for simplicity.

You can see in the left photo below that mine is pretty sparse, which is why it was flopping around loose on the lens body when unlocked. I spent some time while watching TV just mindlessly scrubbing away at the felt with some alcohol-moistened Q-tips, you don’t have to get it all, just remove as much of the old stuff as you can. As far as I could tell, alcohol does not dissolve the glue but seemed to help free some of the fibers somehow. There’s probably a stronger solvent that would work better, but try that at your own risk I guess. Be careful while doing this that you keep the alcohol from going past the locking threads, there’s a different kind of felt in the main body of the hood that’s only there to reduce reflection and you definitely want to leave that alone. I have no idea if alcohol would damage it. The right photo below is what the felt looked like when my TV show ended and I decided “good enough.”

Step 5:

Measure some new felt, cut, and apply with firm pressure over the old glue/felt, being careful to keep it from getting into the threads or sticking past the bottom lip of the hood. I used a piece of scrap leftover from an earlier project, but here’s a photo of the generic packaging. My suggestion would be to cut it longer than you need, then snip the last bit off as you’re fitting it so you can avoid a little gap like mine. Also, I would err on the side of making the strip a little narrower than you think it should be, you really do not want this stuff getting jammed up in the threads.

Step 6:

As with any set of instructions where the author gets tired and lazy by the end, reassembly is the reverse of disassembly. See the last photo above where I summarize the entire reassembly procedure by showing you the rubber end gasket going back on.

If your felt is the right thickness and you applied it well enough, you should be rewarded with a rather tight fitting lens hood, just like new (hell, I don’t know, I’ve never had a new lens like this).

Here’s a video of it in action. Probably hard to tell but it feels pretty good to me. A little too tight, if anything, but I figure it could loosen itself up over time as the felt gets used to its new home:

This was enough for me to decide to keep the lens. This cheap felt is surely not as good as the original but if this is just something I have to do every few years that is fine by me. The standard disclaimer applies; modify your lens at your own risk.

Focusing a Super-Telephoto for Astronomy with Canon EOS Utility

In the preceding post I mentioned how difficult it was focusing for sunspot detail on the disk of the Sun. What I’d been doing was using the Canon CameraConnect app in Live View mode on my phone with a large hooded loupe over the screen so I could see it while standing in the Sun. I manually adjusted the focusing ring on my Canon EF 400mm f/5.6L USM trying to get better contrast/definition on the few sunspots that were visible. There were a few problems with this:

  • Touching the lens to adjust the focus caused everything to shake around violently (with a 400mm x 1.4x teleconverter, even small angular perturbations translate to a lot of pixels on the sensor).

  • The focusing mechanism has a not-insignificant amount of slop/backlash between the external focusing ring motion in the optics.

  • My inability to make microscopic adjustments to the focus (even if there were no backlash and I had the most gentle touch).

Common advice online is that you should “just pick something really far away and focus on that, then you’ll be in focus for the Sun [or Moon, etc.].” Based on my past experience mostly using standard and wide-angle lenses, I would have agreed, but my testing with the aforementioned 400mm + teleconverter showed there was a bigger difference than I expected between “terrestrial and far away” and “astronomical distances away.”

The true way to well-focused astro photos, as it it turns out, is to let the camera lens make its own focusing adjustments. The USM mechanism in such lenses can make such small nudges to the focusing assembly that you may wonder if it’s even working.

Aside from Canon nerfing WiFi support for the 6D in the newer versions of the Canon EOS Utility, it is a really neat program and worked just fine using a USB-A to mini-USB cable (can’t remember the last time I used a mini-USB cable). Hard to believe this camera is already 11 years old, controlling the optics from my laptop makes it feel as if the camera took a step forward at least half as many years. Here’s a screen recording of focusing on the Moon using the program’s Live View controls.

At this focal length (560mm equivalent) and tight digital crop, the severity of the seeing is really bad. “Seeing” is the constant random boiling motion affecting every part of the image. Air has a refraction index (how much it bends the path of light) that depends a lot on the density and thus temperature and pressure (and also on humidity and gas composition). All these factors can vary to lesser or greater degrees as you move through the atmosphere, so all the air along the line of sight to the Moon can have a big effect on the sharpness and stability of the image. This is why stars twinkle. With their minuscule angular diameters and our usually turbulent atmosphere it’s a wonder any of their ancient photons ever reach our eyes at all.

Trying to “see” through the seeing, I leaned toward shorter shutter speeds compensating with higher ISO, but there’s only so much sharpness that will buy me. Some jerkiness is also from my star tracking mount. It’s a Vixen Polarie, which I’d wholeheartedly recommend for an affordable portable DSLR astronomy kit. This perhaps isn’t the greatest advertisement for it, but it’s doing its best considering I’m exceeding the “do not exceed” weight limit by about 25%. I’m just glad it keeps the Moon in the general neighborhood.

I took a handful of photos and a few of them came out reasonably sharp once I’d dialed the focus in on my laptop. Afterward, without touching the focus I slewed the camera over to a building I could see from the park. After increasing the exposure some number of full stops, I took the picture on the right. Measuring in Google Earth, the pictured “WEW” sign is nearly 400m away — a little over 1-millionth the distance to the Moon. Small compared to astronomical distances, but still seems like “near-as-makes-no-difference infinity” for any camera lens. And yet:

Each photo is a 1:1 crop from my Canon 6D’s sensor. I am very impressed at how out-of-focus the sign was at ~0.4 km vs. the in-focus Moon at 400,000 km. If I’d continued to follow the online “focus on a distant object” advice I’d be missing out on a lot of sharpness at astronomical distances.

Anyway, that’s all for today. I’m not sure why I’ve been in a posting mood lately, I’ve hardly thought about this blog in the past 6 years. At some point I’ll just stop posting again, maybe for the last time. Who knows. I doubt there are many readers out there in this day and age of social media and the Google “site:reddit.com” SEO-spam band-aid fix.

Quick addendum; found a non-free workaround for Canon EOS Utility’s removal of support for ad hoc WiFi networks (as the hosted WiFi AP in the 6D apparently is). I already had a cheap 2.4GHz travel router I bought for a cruise ship vacation some years ago, on the ship it let us share a single paid cruise ship internet WiFi plan across all our devices. I dusted it off, booted it up, and connected both laptop and 6D to the internetless router. As expected I was able to connect via EOS Utility. Of course I could have done this with my home WiFi network the whole time, but that’s not available wherever I am in the great outdoors and the travel router only sips a few hundred milliamps from whatever USB power source you happen to have around. I will say that the performance connecting to the 6D directly via USB cable is much better. Over WiFi the Live View latency was very high and the framerate low — I estimate 1.5-2 fps at most, slideshow territory. Over the USB cable it felt more like 10-15 fps which, while not great, was not terrible. One remaining annoyance is that EOS Utility saves images to my laptop during Live View shooting and does not leave a copy on the SD card, which is annoying because my photo post-processing workflow does not involve my laptop at all.

Thousand Oaks vs. Baader Planetarium Solar Filter Films

With all the buzz about the eclipse going on I thought about revisiting the topic of solar filters. I’d previously imaged the sun very precariously using regular ND filters (10-stop, or stacked 10-stop + 6-stop) but this is inadvisable as they’re not rated for this use. I did this by shielding the entire aperture with a piece of cardboard between photos and manually jerking it out of the way just in time for each photo (based on my intervalometer’s pre-photo beeps). This was years ago and near as I can tell there was no damage to my equipment but it was still a bad idea in hindsight. I was perhaps lucky; not all conditions and filters are the same, and damage to your focusing screen, sensor, and even eyes could result (it’s largely about the parts of the EM spectrum you can’t see).

Considering instead filters meant specifically for solar photography using a camera with a super-telephoto lens, you essentially have two options — screw-on glass solar filters, and solar filter film. I haven’t experimented with the former, this post is specifically about the latter.

Two common solar filter films I saw suggested on astronomy discussion forums are sold by Thousand Oaks (TO) and Baader Planetarium (BP) and I ended up doing a side-by-side comparison.

My first purchase was a 6x6” square of Thousand Oaks film on Amazon. The Amazon listing is a little ambiguous about which of their films you’re buying, I believe I received what they call their “Silver-Black Polymer Sheets.”

For comparison, I ordered (also on Amazon) the Baader Planetarium “AstroSolar Safety Film 5.0.”

As they’re intended for use on any aperture size, both of these products require you to construct your own filter holders. There are myriad instructions online for how to do this so I’ll omit providing any of my own here. I made holders for both films using Planters 10oz peanut cans with the bottoms removed, a hot glue gun, and a lot of tape. It turned out that with a little effort the inside of the Planters cans fit nicely around the extended hood of the Canon 400mm f/5.6L USM I picked up used (see previous post). I will say that the TO film is much more sturdy, I felt less nervous building the TO film filter holder vs. the BP, which felt like handling gold leaf by comparison.

Here’s a side by side comparison of solar images through the TO and BP filter materials (TO on the left, BP on the right):

fog_before fog_after

The above photos are 1024x1024 full-resolution crops from a Canon 6D using the Canon 400mm f/5.6L USM with a Canon 1.4x teleconverter (original version, quite old). In each the sun was about half-way between center and the top of the frame (the sun moves quite fast when you’re futzing around with settings at 560mm equivalent focal length). I also rotated the BP image to align with the TO image, as the sun’s movement between filter swaps resulted in a small line-of-sight rotation relative to my pan/tilt mount (this reduces the BP image sharpness slightly).

The teleconverter undoubtedly reduces the sharpness some also, and I’m not sure if there’s a clear difference in terms of optical clarity between the two filter materials. However, the BP filter lets through way more light, so the ISO ends up being lower, hence the much higher relative amount of noise in the TO image, and better definition of the sunspot detail using the BP film. My initial interest in the BP film was after seeing a blog post somewhere else that compared the two films and showed a much sharper image with the BP film. In hindsight, I suspect that poster may have had the same challenge I did — difficulty focusing through high-ISO noise on Live View. I may have better luck running the camera tethered and using the EOS app to adjust focus, I’m not currently set up for that though, so TBD I guess. In-camera settings for each, to give you an idea about the difference in light transmission:

  • TO: f/8.0, 1/800s, ISO1600

  • BP: f/8.0, 1/1600s, ISO100

Doing the math (and excluding my LR adjustments), there’s about a 5-stop difference which is more than I would have expected. Also, the TO filter (as advertised) produced a really strong orange tint, which is maybe what you expect thinking about the sun as a cartoonish yellow orb in the sky, whereas the BP provided a nearly perfectly white image of the sun. I used the white balance eyedropper in Lightroom to bring the TO closer to white, for the side-by-side comparison, but I made no additional effort to match the white balance.

I’ve included a gallery at the bottom of this post showing the “As-Shot” and edited Lightroom settings I used for each. I didn’t think too hard about this for the editing, just played around to get some extra contrast in the sunspots. Note that some of the LR screenshots shows f/5.6; this is because I have several of the pins taped off in the teleconverter so I can still use autofocus with this slow lens. I’m shooting wide-open through the teleconverter which gives me an f/8 equivalent aperture for both photos. Also keep in mind that the “As Shot” white balance values are just what my Canon 6D decided to go with based on a small disk of light against a large black background, I wouldn’t consider either of these to be objective truths on color rendition.

In addition to loss of sharpness using the TC, I found it really difficult to focus the lens on the sun, especially with the TO film. The decreased amount of light means Live View is using a much higher ISO, so the image is just boiling with noise in 10x viewfinder crop mode, and coupling that with the 2x2 or 3x3 (?) pixel binning that occurs in Live View on this camera, it’s more of a guessing game than anything else. The backlash in the focusing mechanism makes me skeptical that using the scale reading will be a reliable means of getting focus for solar imaging.

In conclusion, I’ll probably use the Baader film for imaging because of the more neutral color rendition and better exposure flexibility, but the Thousand Oaks may go on a spotting scope or something for visual observation, e.g., during an eclipse. I think the orange disk of the sun through the TO looks quite nice, from a purely aesthetic standpoint.

Planespotting

Been a while.

I headed down to Cutler’s Park in El Segundo this weekend as a first daytime shooting test of a used lens I picked up recently — a Canon EF 400mm f/5.6L USM. It’s an old unit sourced through a random Japan-based seller on Amazon and the whole thing is a lot sketchier than I’m used to. Usually Japan-based sellers for whatever reason do an exceptional job at accurately rating their used photography equipment, and until now I’ve never received an item from Japan where I disagreed with the grading (this is true when it comes to vinyl records also). Despite the seller’s listed location, Amazon fulfillment started in Austin so this lens was possibly returned recently by someone else who found its condition unacceptable (I am still on the fence). The most obvious problem is that the lens hood is always loose unless it’s tightened into its extended position. This now-discontinued model has an integral lens hood that retracts for storage and is supposed to be held retracted via friction between the optical tube and the hood’s felt liner, but decades of abuse have left it with enough slop that it slides forward or backward freely with no resistance. The body was also extremely dirty with numerous small sticky spots like it had been operated by someone with sugar-coated fingers. I cleaned the exterior thoroughly and it looks better but the paint is thoroughly chipped and there are countless deep scratches, indicating an impressive lack of care by a previous owner. On the plus side, through some miracle the filter threads appear undamaged, the optics are reasonably clean, and the aperture and auto-focus operate as expected.

I also tested this with an old Canon EF 1.4x teleconverter (TC) that a Craigslist seller tossed in on some other random purchase over a decade ago. This brings the equivalent focal length to 560mm, and max aperture of only f/8.0. Taping off three of the interface pins turned on auto-focus with my old 6D via the center AF point; seemed to work fine under bright conditions, at least. I had expected this given that Canon’s marketing boasted that this camera body is capable of auto-focus under moonlight. The auto-focus cutout above f/8.0 is apparently mostly artificial, possibly as a differentiator for sports/wildlife photographers who may have been tempted by a 6D over a 5D Mark II at the time. It’s worth noting that my EOS 3 (a prosumer film body released in 1998) can auto-focus just fine through the 1.4x TC without the need for taping pins.

The atmospheric conditions were not geat. As is typical for the South Bay, the heavy ocean air muted the blues in the sky and left mostly gray and bland feelings all the way until sunset, when some colors briefly appeared to the west. The seeing was terrible and anything beyond the nearest runway was severely blurred by the turbulent air. Using the 1.4x TC briefly, the quality on short shots and auto-focus were fine, but the extended focal length was no help against airplane-sized subjects due to the poor seeing. Any aircraft that was far enough away to fit into the field of view at 560mm was far enough away that the seeing made a sharp photo impossible. Wasted pixels. I stowed the TC after only a few minutes and feel that while 560mm is too long, 400mm on a full frame is not a terrible choice for prime lens shooting from Cutler’s Park.

Given that this lens has no image stabilization (IS), I used a tripod with a 3-axis pan/tilt/roll head, with only the roll-axis locked down. This lens isn’t as heavy as a lot of super-telephotos out there, but it was nice to not have to support it for the 90 minutes I was shooting. Overall I think the lens is fine, although the loose hood is extremely annoying. I’ve been keeping it stowed with a piece of blue painter’s tape which is a real hassle and may be enough to compel returning it and looking for a better used copy. I don’t shoot enough telephoto stuff to justify spending much more than I already have on this, so a new unit from Canon’s in-production lineup (starting in the thousands of dollars) is out of the question. At this point, whether I return it or not depends on if I think fixing the hood slop will be a doable DIY effort or not.

Anyway, here are some photos I shot along with 2 quick-and-dirty stitched panoramas in 48:9 aspect ratio, suitable for a three-wide UHD desktop wallpaper. For the two takeoff photos of the Lufthansa A380 I ended up going to ISO 12800, which is well outside the usable range for a Canon 6D in my opinion. This aircraft was waiting on the taxiway for a really long time and took off well past when there was sufficient light for an f/5.6 telephoto with no IS. By the time they took off I knew the images would be junk at such a high ISO but shot them anyway. I post-processed them in Topaz Photo AI which has a RAW denoise model — it’s passable sometimes but tends to overdo it, and turning the strength down introduces a lot of low-frequency noise and artifacts. There’s probably a better tool for this but since I almost never shoot high ISO it hasn’t been worth the time to experiment. I think the jet wash and wake turbulence looks cool against the airport background. Also the four vortices coming over the wings from the engine nacelles in the last photo are neat.

Left-to-right: Qantas Boeing 787-9, Lufthansa Airbus A380-800, Delta Boeing 737-900/ER, Asiana Airbus A380-800 (behind the Korean Air A380), Korean Air Airbus A380-800
Full-size 11520x2160
I like how tiny the Delta 737 looks compared to the wide-body jets.

Left-to-right: Qantas Airbus A380-800, Lufthansa Airbus A380-800
Full-size 11520x2160

Growth of Austin, 2013 to 2017

While putting together my most recent film, I spent some time re-shooting and processing old and new footage to see how the skyline has grown over the past 3-4 years. Here are some comparison gif files (use the slider to compare):


2014 vs. 2017, Pfluger Bridge

fog_before fog_after

2013 vs. 2017 from Mopac/Bee Cave Rd

fog_before fog_after

2014 vs. 2017 from Lou Neff Point

fog_before fog_after

SCENERY - Austin

Take a fast paced timelapse tour of Austin, the fastest growing city in the United States. Filmed in 2016 and 2017, "SCENERY - Austin" is an independently funded and solo-produced timelapse and hyperlapse project exploring the growing skyline of the flourishing capital of the Lone Star State.

"SCENERY - Austin" is a compilation of highlights from 200+ hours of shooting and 600+ hours of post-production. All motion control was performed manually with hyperlapse techniques (for long-run scenes) or by leveraging my own custom designed and manufactured digital motion control systems (for the short-run scenes).

Music is courtesy of Le Nonsense (soundcloud.com/lenonsensebeats).

Happy New Year!

This year I shot the fireworks from Zilker Park on the downward slope of the Great Lawn. Half the park was still closed due to Trail of Lights that had ended a week earlier but I was able to shoot over the fence, and the foreground was pretty dark anyway.

The smoke from the fireworks this year was particularly severe, compounded by a breeze that was very slow and intermittent out of the south so it lingered in pockets all over the north side of town for hours. Driving and walking around town afterward took a toll on my lungs and sinuses that I'm still feeling 36 hours later! I felt like I was in the Far Harbor DLC for Fallout 4, where random clouds of radioactive fog drift all over the map and damage your character.

The Supermoon over Austin and Why You Probably Wouldn't Notice If No One Told You

Unfortunately this month's appearance of the so-called "supermoon" was obscured by overcast, but here's a photo I snapped around this time last year of another supermoon.

A "supermoon" is what the media likes to call a full moon when it's near the perigee of its orbit, i.e. it's at its closest approach to the Earth. The Moon gets this close to the Earth once during each orbit of the Moon around the Earth, so about once every 28 days; thus the Moon appearing this large in and of itself is nothing special, but I suppose it makes for feel-good fodder on slow news days. In actuality the Moon only appears slightly larger; about 14% larger than it appears at apogee (this is when it appears its smallest), or around 6-9% bigger than the average apparent size of the Moon. Because of this small difference, combined with the fact that we only see the moon intermittently over long periods of time, and in different phases, it is highly unlikely that the average person would naturally notice the Moon was larger or smaller from week to week.

There are a few reasons why people "notice" a supermoon being bigger than a regular full moon, and it all comes down to our imperfect human perception.

First, the news reminds us to look at the Moon because it will be bigger than usual. We go out and look, and because a bigger moon is what we're expecting, we agree "well, I guess it does sorta look bigger." This is a form of confirmation bias. In truth, most of us have no intuitive sense for how big the Moon should actually appear, certainly not to an accuracy that would make us notice that the moon was 5%, 10%, or even 14% larger than at some other time we saw it.

Secondly, a full moon rises during sunset because a full moon is always on the opposite side of the Earth from the sun. Most people are out and able to see the Moon around sunset during their evening commute, so when there's a full moon (or a supermoon), most people will see it as it's rising, close to the horizon. When the Moon is close to the horizon it always appears bigger regardless of where it is in its orbit -- this is an optical illusion of sorts because suddenly we see the Moon next to objects on land and its comparative size appears bigger. This problem, sometimes called the "moon illusion" is a long-known issue with human perception and has been discussed by scholars for thousands of years. Click here for more information on the "moon illusion." Typically, doctored photographs (of which there are many on social media after the media hypes a supermoon) fraudulently increase the size of the Moon almost to the point of ridiculousness, most likely because the photographer thought that the Moon "looked really big!" and is confused as to why their photographs don't reflect what the optical illusion had them perceive, regardless of the focal length the photo was captured at. The photograph they took is indeed accurate, but being a flat image, it just doesn't play into the same part of our brain that produces that optical illusion of the Moon looking huge next to the horizon. In actuality, any time you see the sun or the moon rise behind features on land, it will appear very big.

As a consequence of being marginally closer to the Earth, a supermoon also appears slightly brighter, owing to the fact that the flux (or density) of reflected photons from the surface of the Moon is higher when we get closer to it. An analogy for this would be that your shower feels more intense when you move your face closer to the shower head. However, I would argue that most people wouldn't notice this change in apparent brightness any more than they would notice an increase in apparent size. Our eyes involuntarily adjust to low light levels all the time, and it would be impossible to make an assertion that the Moon was brighter one night vs. another without using some additional equipment (a camera with manual exposure controls would suffice). Also, the clarity of the atmosphere (depending on temperature, humidity, particulates, etc) varies frequently, adding yet another variable into the situation that we humans are not well suited for evaluating without special equipment.

To me, supermoons are fun just because they get people interested in and talking about the Moon. The Moon, while not a favorite subject of mine in and of itself, is definitely one of my favorite compositional elements in a photograph, and all the overzealous reporting in the world won't change that.

A Few Shots from July and August

Here are a few photos from the past two months that I haven't shared yet; I very easily get swallowed up in big projects and start to neglect all my social media stuff, which I've been really bad about this summer.

One of my favorite shots in July came when I captured the moon transiting the capitol dome. The clouds were perfect and I managed to get just the image composition I was looking for.

The Moon transiting the Texas State Capitol dome

Earlier this week I was doing some traffic shots in south Austin, from which I noticed the UT tower's lighting was going on and off and had a bizarre non-tungsten color balance.

Evening Mopac traffic

When I got closer I saw that they'd brought in a special lighting system and were running through various test programs on their equipment. I realized this must be preparation for the 2015 Gone to Texas ceremony scheduled for the following night. Gone to Texas is a UT ceremony to welcome incoming freshman to the university and is so named because legend has it families that pulled up roots to move to Texas before it became a republic would write "GTT" on the door of their vacated homes, short for "Gone to Texas."

University staff ran through every color of the rainbow in varying combinations on different sections of the building and were even projecting animations and video onto the south facade of the tower. I have more photos from that night posted on my Instagram page.

Gone to Texas Class of 2019 UT tower lighting test